


EN-SFM03 Systems Condition
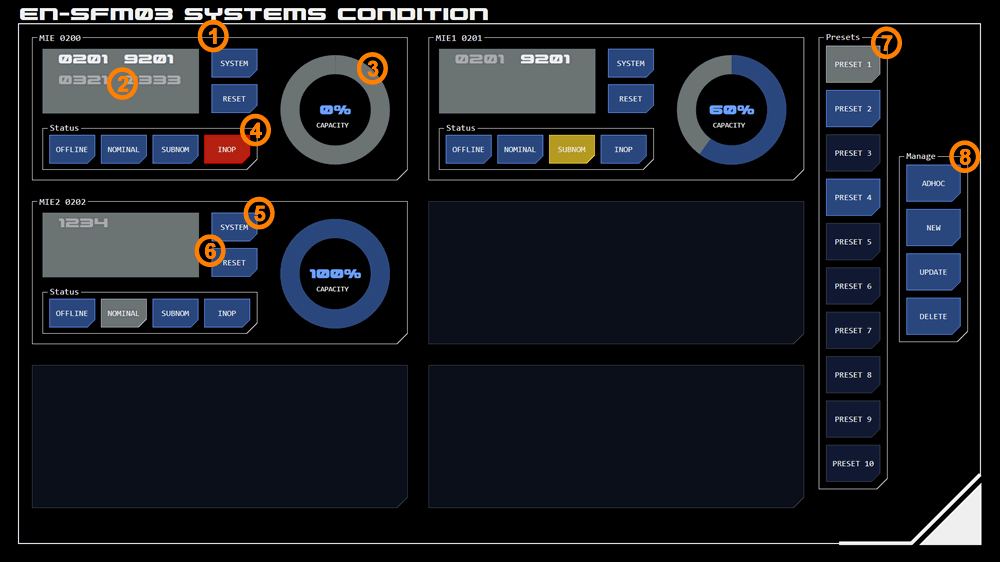 This panel is used by simulation administrators to manage the behaviour of selected systems or PDN nodes, to simulate system failure or some other contingency.
Up to six systems can be managed on each panel.
This panel is classed as administraive and so requires an admin code to access.
To assign a system to a module, tap an empty module. The system selection dialog will be displayed. Enter the system number.
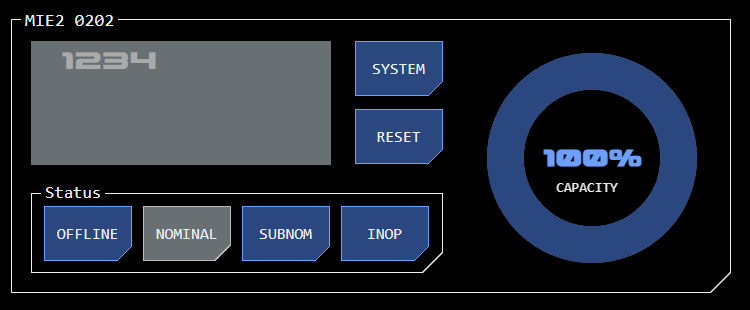
1. System Module
Each controlled system is assigned to one of the panel's six modules from where a number of behavioural characteristics can be managed.
These characteristics simulate an issue with the system which is described as a contingency.
2. Contingencies/Diagnostic Codes
 System contingencies are represented by diagnostic codes which define the contingency's parameters.
Selecting a diagnostic code is the typical way to initiate a contingency, as it sets the appropriate combination of diagnostic code, status and capacity automatically.
Inactive codes are greyed out. Tapping a code activates the contingency and the system's status is changed accordingly. The status and diagnostic code are displayed to end users on any console panel controlling or monitoring the system.
 Active codes are displayed white. Tapping an active code deactivates the contingency and changes system status back to nominal (or to offline if the system had been offline before the contingency was activated. In that situation, the OFFLINE button will display in select mode along with the SUBNOM or INOP button to indicate this will happen).
Multiple codes can be activated at once, with the highest impact contingency applied. Deactivated one of multiple active codes causes the next highest impact contingency to be applied.
3. Capacity
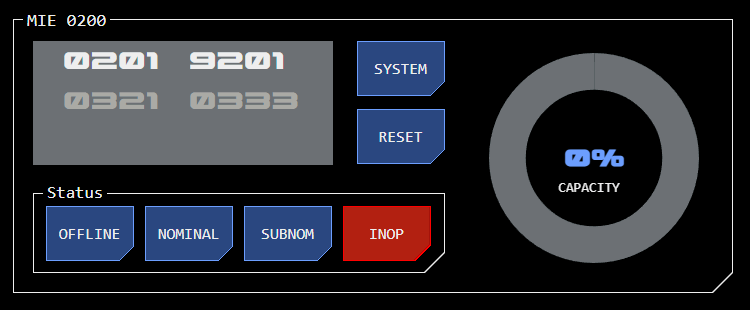 A system or node's current operating capacity can be adjusted using this radial slider. Capacity is expressed as a percentage of the system or node's rated capacity.
Changes to capacity are applied to the system or node immediately.
Setting a system to offline or inoperable status (see below) will automatically reduces system capacity to zero, although this can be overruled by the operator by manually setting a new capacity.
4. System Status
The operating status of systems or nodes can be set to one of four options, listed here in order of contingency impact (from lowest to highest):
Offline: The system or node is offline but is otherwise operable and can be set online by end users at any time. Capacity is usually reduced to zero.
Nominal: The system or node is online and operating normally at full rated capacity
Subnom (Subnominal): The system is operating but subject to a contingency, which typically means operating at below rated capacity. The appropriate diagnostic code must always be set when subnominal status is active.
Inop (Inonperable): The system is damaged and cannot operate. Capacity is usually reduced to zero. The appropriate diagnostic code must always be set when inoperable status is active. Repairs will typically be required before the system can be operated again.
5. System Selection
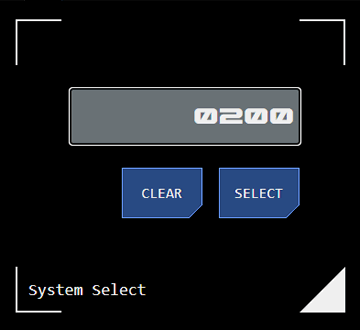 Tapping the SYSTEM button displayed the system selection dialogue.
Entering a new system number and tapping SELECT will replace the currently selected system. If a keyboard and mouse ar present the number may be typed in and the ENTER key will perform the function of the SELECT button.
Tapping the CLEAR button will remove the system from the module, leaving it empty.
6. System Reset
Tapping the RESET button sets all active diagnostic codes to inactive and sets the system to nominal status (or to offline status if the system had been offline prior to the contingnecy being set).
7. Presets
A preset populates modules with a preselected set of systems.
Tapping the appropriate preset button updates the panel accordingly.
Where a preset has not been defined for a button, it will be displayed with offline status.
8. Managing Presets
Presets can be added, updated or deleted using these buttons.
Adhoc Mode
Tapping the ADHOC button clears all presets and empties all modules, so that the user can manually assign their own system selections.
Adding a Preset
To add a new preset, populate the panel with the desired systems. Tap the NEW button, which will display alert state, then assign to an an empty preset by tapping that preset button.
New presets cannot be assigned to existing presets.
Updating a Preset
Any changes made to a preset can be applied to that preset by way of an update, by tapping the UPDATE button.
Deleting a Preset
The current preset can be deleted by tapping the DELETE button. The user will be asked to confirm this action.
Once deleted. all modules are cleared and the preset button displays offline status, indicating it is available to be assigned a new preset.
Concept Site
Immersive sci-fi and how to join the adventure
Crew Site
Information and tools for ISDC crew members


