


TL-WDR02 Torpedo System Panel
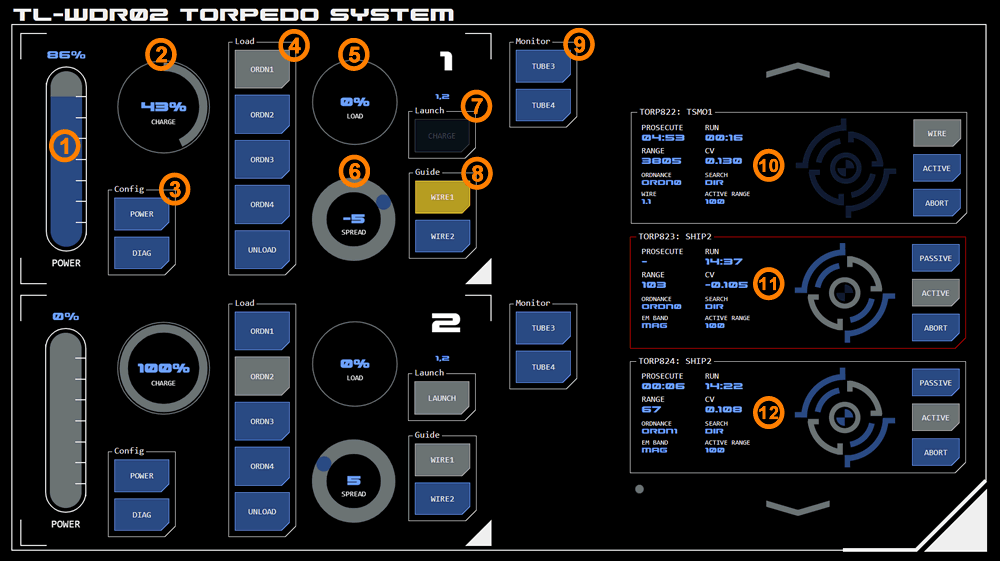 This panel allows torpedoes to be loaded into firing tubes, launched and tracked until prosecution. It includes two modules: torpedo load and torpedo flight status.
Torpedo Load
The status of two firing tubes can be displayed on the panel at once. Additional tubes are selectable from the monitor buttons (9) at the right of the tube status modules.
Torpedo Tube Charging
The firing tube capacitors must be charged before the torpedo can be fired. The amount of power to allocate to charging can be controlled by the linear slider (1). The amount of charge is displayed in a radial monitor (2). Due to the multi-stage design on the railgun launchers used in the tubes torpedoes cannot be fired before full charge is complete.
To discharge the tube, ensure it is unloaded. The launch button (7) will display DISCHARGE and tapping it will discharge the tube.
Ordnance Selection
The type of ordnance to be loaded can be selected (4). There are four types available.
A radial monitor displays progress loading the torpedo (5). The torpedo cannot be fired until loading is complete, at which point the radial monitor returns to zero and the button for the selected ordnance displays active status.
 Once loaded, a torpedo can be configured with search parameters from the weapons direction panel.
An already loaded torpedo can be unloaded if needed by tapping the UNLOAD button.
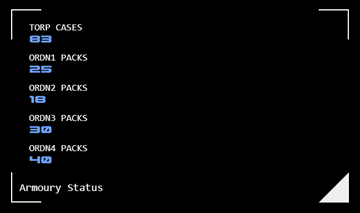
Armoury Status
The number of torpedo casings and ordnance packs can be checked by tapping the triangular icons at the bottom-right of either of the tube load modules' frame. An overlay dialogue (right) is displayed and can be dismissed by tapping it's triangular frame icon.
Ordnance is counted as removed from the armoury when loaded. It is added back if the tube is unloaded.
Multiple Launch Configuration
A spread of torpedoes (simultaneous firing of multiple torpedoes) can be configured.
A tube is added to the spread by selecting a spread angle value using the radial slider (6). The torpedo's launch will be offset by this number of degrees. If a zero degree value is required, tap the spread label in the centre of the radial slider. Tapping the label again removes the tube from the spread.
Specifying a non-zero launch angle is only effective when no guidance has been configured for the torpedo, as otherwise the guidance will quickly correct the torpedo's heading.
The tubes included in the spread are indicated immediately above the launch button (9) of every tube included in the spread. The launch of the spread is initiated by the launch button of any of the included tubes.
Launch
The LAUNCH button (9) displays a number of states depending on the status of the tube:
- If the tube has been both loaded and is fully charged, the button displays active status and LAUNCH.
- If the tube has not been loaded but has been charged, the button displays available status and DISCHARGE.
- When the tube has not been charged, the button displays unavailable status and CHARGE.
When the button is active and displays LAUNCH, tapping it will launch the torpedo (and any other torpedoes included in a spread)
Wire Guidance
Two wire guidance transceivers are available and are assigned to a torpedo prior to launch (8).
Once assigned, the transceiver's button remains active until launch, but can be unassigned by tapping the button again.
After launch the button changes to alert status (indicating the transceiver is in use). The transceiver can be released at any time by tapping its button and confirming release. The transceiver will automatically be released when it loses line-of-sight to the torpedo.
Torpedo Flight Status Module
A scrolling list module displays details for all torpedoes in flight. If prosecutoon is likely to be unsuccessful base don current data (if CV is below zero, for example) then the border will display alarm status (11).
Data Display
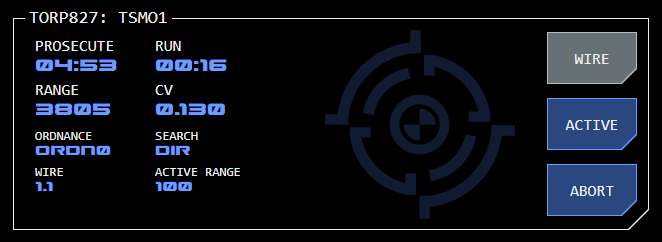 Data displayed for each torpedo includes:
Run: This indicates how much time has elapsed since launch
Range: The range of the target (from the torpedo)
Ordnance: The torpedo's ordnance type
 Search: The torpedo's configured passive search mode. Where a radial or alternating pattern is configured, this will include bearing and scope.
Some of the datapoints displayed vary depending on the torpedo's flight mode:
Wire Mode (10)
When wire guidance is active (TORP827 example, right), the data display shows:
Prosecute: Estimated time to prosecution
CV: Closing velocity
Wire: Which wire guidance transceiver is being used by this torpedo. The first number is the tube, the second (after the decimal place) indicates which of the tube's two transceivers.
Passive or Active Mode (12)
When passive or active mode is engaged (TORP821 example, right), the data display shows the configured EM Band instead of Wire.
No Guidance
 When no guidance is active (TORP829 example, right):
Prosecute is replaced by Speed (indicating the torpedo's estimated speed)
Range is replaced by GridX (the torpedo's estimated X co-ordinate on the TOE grid)
CV is replaced by GridY (the torpedo's estimated Y co-ordinate on the TOE grid)
Range Visualiser
 A visualisation (right) indicates at a glance the range to target.
The visualisation has six stages, from top-left moving right:
- Stage 1: Outside first range threshold
- Stage 2: Range threshold 2000 GUs
- Stage 3: Range threshold 1000 GUs
- Stage 4: Range threshold 500 GUs
- Stage 5: Range threshold 250 GUs
- Stage 6: Range threshold 100 GUs
When the system estimates a successful prosecution, the visualiser displays in all red.
Flight Mode Buttons
Three buttons at the right of each torpedo display show the current flight mode and allow the weapons director to manually override the current flight mode, including an option to abort (destroying the torpedo).
From the top:
Wire/Passive
The first button displays active status and WIRE when wire guidance is active. Tapping the button while in this status releases the wire guidance.
When wire guidance is not active, but the torpedo has been configured with passive guidance parameters, the button displays available status and PASSIVE. If no passive guidance has been configured, the button displays unavailable status and NO GUIDE.
Active
The second button manages the torpedo's active (RADAR) guidance system.
At launch the second button displays available status and ACTIVE, indicating active guidance mode is available but has not been engaged.
If the button displays active state, active guidance has been engaged. This can occur automatically if the torpedo reaches the range specified.
Tapping the button at any time will toggle engaging active mode.
Abort
The third button allows the torpedo's flight to be aborted at any time, destroying the torpedo.
If the torpedo has successfully prosecuted, this button will display CLEAR. The torpedo will remain in the list until cleared using this button.
Attachments:
Concept Site
Immersive sci-fi and how to join the adventure
Crew Site
Information and tools for ISDC crew members


